Security cameras are a great way if you think to add more protection for you and your family as it keeps you monitoring the activities of each thing that happen around your property.
Unfortunately, as surveillance cameras work during the whole day and capture HD videos sometimes it’s run out of storage quickly.
Once the storage space of your security system is complete the system will show an alert message. After that, the surveillance system performance starts to be slow. Plus, managing and controlling the cameras become a little complicated.
Anyway, it’s important to clean your security camera storage space whether it’s storing recorded videos on HDD, Cloud Storage, PC hard drive, or a Micro SD card.
Previously we discuss how to delete security camera footage from DVR, and specific models of security cameras like Night Owl, Samsung, and Hikvision systems.
In this article, we will explain in detail how to format SD card for security camera and mention some tips and tricks for getting more free storage.
Moreover, we’ll mention based on our experience the benefits of formatting SD cards for security cameras, and the risks associated with formatting SD cards. Just Keep reading to find out.
First
Why Does an SD card of a Security Camera Need to be Formatted?
There’re many of know reasons why homeowners love to store video of their cameras on SD cards.
One of these reasons is how easy to format the SD card, the simplicity of removing separate videos, and the removal of storing problems that may affect the footage quality.
For example, If there are any errors on the SD card, formatting it will clear errors and prevent them from causing extra problems with the new stored footage on the card.
So whenever you face any issue related to storage space, all you have to do is to format the SD card.
By doing this, you are clearing all the data from the card and preparing it for use to store new recoded video clips without any errors.
Moreover, By formatting the SD card, you are ensuring that the footage will be stored correctly and there will be no glitches or problems with playback.
Not only that, as we mentioned above, When an SD card is full of data, it starts to slow down the camera.
So, freeing up some space on the micro card of a security camera can help you to improve the performance of the camera.
How Do you Format an SD Card for Security Camera? (Tested Methods)
Now that we know why you need to format an SD card for a security camera, let’s take a look at how you can do it.
The process of cleaning an SD card is quite simple and it doesn’t matter if you’re a beginner or an expert, it can be done in just a few minutes
Method 1: Format SD Card for Security Camera Via Mobile App
Most security cameras come with a mobile app that it’s used to manage the camera.
Also, from the application, you can control how you want to view your camera footage, change the settings, and format the SD card.
So, if your camera came with a mobile app, you can use that to format the SD card. To do this, you should follow these steps:
1. Open the mobile app for your security camera.
2. Tap on the “Settings” or “Configuration” menu.
3. Press on the “Memory Card” option if it appears.
4. Scroll down and tap on the “SD Card Format” option.
5.. Tap the “Format” button and follow the on-screen instructions to format the SD card.
This is one of the simple methods used to delete security camera footage from mobile, there are more short and easy methods also that you can learn.
For more info about how to do these steps, watch the next video
Source: ShareIT
Method 2: Format Security Camera SD Card through PC or Laptop
Another way to format SD Card for security camera is to use a card reader with a PC, or laptop.
Aside from formatting, opening SD card files through the card reader on the computer allows you to control, delete day videos, or remove only specific videos not clear all the data.
Let’s see the steps in detail on how to do this

Step1: Make backup copies of all files before you start formatting the card. Also, If you’re using a laptop, ensure it’s connected to a reliable power source.
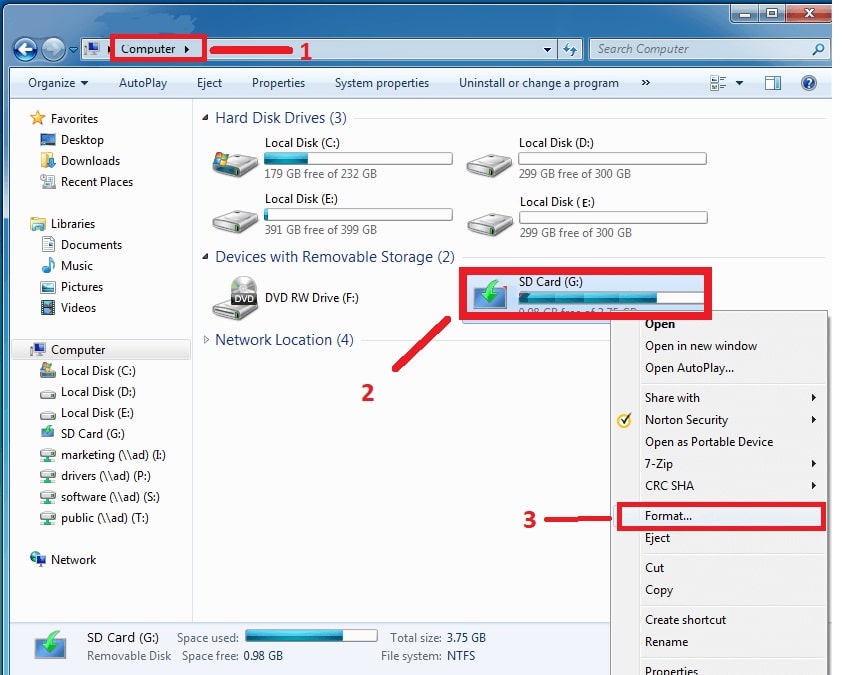
Step2: Insert the SD card of the camera into an SD card reader or an external USB reader on your computer.
Step3: Turn the PC, then after minutes launch File Explorer (which means open any folder).
Step4: Go to the left column and select ”This PC or My Computer”. The meaning of these statements depends on the version of windows.
Step5: Click the “SD Card” in the device list. When you do this, your computer will open the SD card.
Step6: Press right-click on the SD card icon, then Select Manage > Formats and a window will appear.
Step7: Under “File System” there is a drop-down menu. Click it and you’ll see some options. If you use the SD card on multiple devices, please select “FAT32”.
Step8: Press “Start” when you are ready to format the SD card. To format the card, click on the pop-up window that appears.
Pro tip: Do not check the Quick Format box when formatting the card for the first time. If not, you can choose “Quick Format” instead.
After the Windows computer or laptop has formatted the card, remove the memory card from the card reader and insert it again into the security camera.
Method 3: Format the Security Camera SD Card from your Smartphone File Manager

While formatting SD card from mobile apps sounds easy, there are some peoples’ who want to format SD card for security camera in another way.
But don’t worry it’s simple also! The next method depends on using the smartphone file manager to clean up the SD card from old data.
Note that: Files on the memory card of your security camera should be backed up before you start with anything.
Here’re the steps
Step1: Take the SD card out of your security camera carefully.
Step2: There is an SD card slot in any tablet, smartphone, or android device.
Step3: Open the slot of the device, insert the SD of the security camera inside the slot, and ensure it works normally.
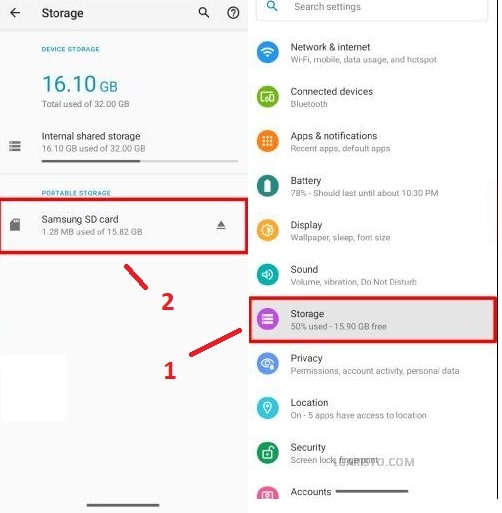
Step4: Depending on your mobile type, Select “Settings” or “File Manager” and then hit “Storage”.
Step5: A small menu will open and shows 2 options. The first one is “internal storage” of smartphones, and the second is “SD card storage”, press on the second option to continue.
Step6: Look at the recorded videos that exist on the SD card storage, and from this file choose the videos that you want to delete, or you can format the SD card.
Once you finish formatting the SD card on the smartphone, you can take it from the slot and insert it into the camera again.
Pro Tip: Always format the SD card using the correct instructions to avoid any problems.
Pros and Cons of Formatting SD Card for Security Camera
There are some advantages and disadvantages of formatting your SD card. Let’s take a look at some of the pros and cons:
PROS:
1. Formatting an SD card for a security camera is necessary to protect your footage from anyone who wants to hack your system.
2. Deleting all previous footage and creating more storage space for new footage.
3. Formatting also clears up any errors that may have been caused by improper use.
CONS:
1. If the SD card is damaged or corrupted, it could result in loss of footage and/or inability to access footage that has already been recorded
2. To format the SD card, you’ll need to remove it from the security camera and use a computer or other device.
3. Taking off the SD card from the security camera requires unscrewing the camera and then re install it again.
Conclusion
Formatting an SD card is an important security step for your surveillance system. By following the simple steps in this blog post, you can ensure that your footage will be safe and secure.
Have any questions about formatting your SD card? Leave a comment below or contact us for help! We will try our best to answer your questions as soon as possible. Thank you for reading!

