Many Dahua users look for expanding their surveillance system and adding more IP security cameras but they face a tiny issue which is how to connect two Dahua NVRs together and combine them as a single unit.
Well, to connect Two Dahua NVRs together you have two options and you have to choose the best for you.
The first option is to connect the NVRs from Dahua wirelessly by using a WiFi bridge (receiver linked to the main NVR & sender connected to the 2nd NVR).
The second way is to connect Two Dahua NVRs together by connecting them with an Ethernet cable securely connected from the 2nd NVR to the main NVR.
In this blog post, we will show you how to easily connect two Dahua NVRs together using a few simple steps.
Next,
How to Connect Two Dahua NVRs Together? Or How do I connect my Dahua NVR to NVR?
Dahua NVRs are a popular choice for homeowners who need to monitor their property with high efficiency.
However, In a few cases, the Dahua users invest in a new NVR for monitoring a far away area from their house.
Unlike beginners, they need to control and manage all of their IP cameras installed around their homes from one video recorder. But How?
It’s easy, they just need to combine two Dahua NVRs together, and with a simple setup, they’ll manage to view the IP cameras feed on their display screen.
What I mean by setup is assigning an IP address to each of your Dahua NVRs, also configuring your other network settings so that the two NVRs can communicate with each other.
Helpful Link: Best Network Video Recorder For Home Use.
Now, let’s see the steps
Step 1: Establish a wired /wireless connection between NVRs
For connecting two network devices there must be a connection between the devices whether wired or wireless connection.
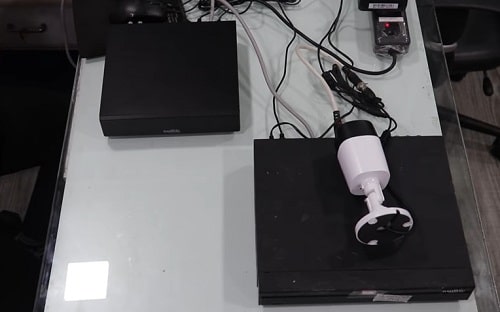
Depending on the available option you have, you can link both of your Dahua NVRs through a wired ethernet cable, and in this case, you’ll be limited by the distance between the video recorders.
Cat5, Cat5e, or Cat6 cables provide single up to 99 m, once you pass the limited distance then your connection will start to weaken until you get a switch.
If the distance between your network video recorders is less than 99m, then bring an ethernet cable, then attach the 1st end to the 1st NVR, and the 2nd end to the main NVR.
However, you can connect two Dahua NVRs together wirelessly by picking a wifi bridge if your NVRs are far away from each other. Also, if you don’t like system wiring you can use this way for short distances.
Simply purchase one long-distance WiFi bridge, connect the 1st unit to the 1st NVR via network cable, and the 2nd device to the main NVR.
Step 2: Configure Each NVR separately
When the installation process is completed and you ensure that everything is connected correctly, power on both NVRs respectively, then bring an HDMI or VGA cable, and a monitor for configuring each NVR.
The configuration process is a crucial step and it will help the two Dahua NVRs communicate with each other. Here are the steps:
1- Take an HDMI or VGA cable and connect the main NVR to a TV or monitor.
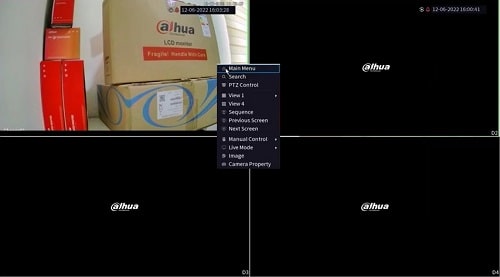
2- Once connected, log into the main NVR interface on the monitor.
3- Navigate to “Main Menu” > from the bottom options click on “Network”> on the “TCP/IP” page.
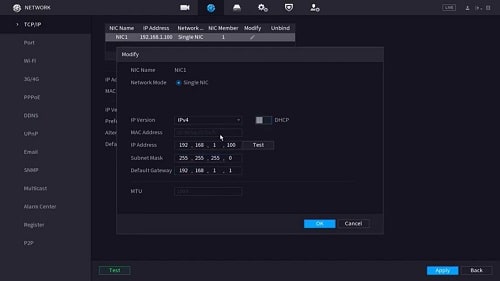
4- Disable “DHCP”, Then set up a unique IP address, the subnet mask, default gateway, and DNS server for the main NVR.
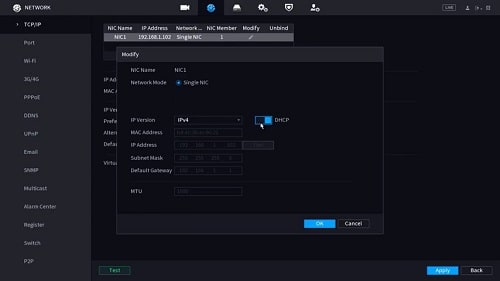
5- At the moment you have entered all of the necessary details, click “Save” and then restart your main NVR.
By analogy apply the same steps to the second Dahua NVR and ensure that you assign a different IP address for the 2nd NVR, and use the same subnet mask, and gateway address.

Keep in mind that the IP address should be unique for each NVR, but both NVR IPs should be from the same class or range to communicate with each other.
Usually, the NVR IPs are taken from the C-class IP addresses. E.g 1st NVR IP can be 192.168.1.100, and 2nd NVR IP can be 192.168.1.102.
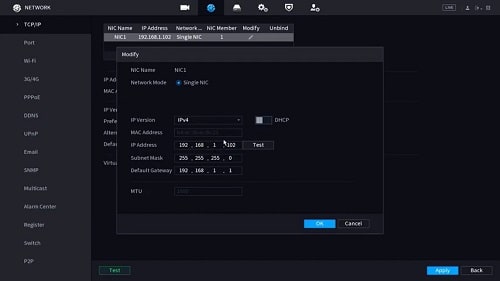
Concerning the subnet mask, it should be set to 255.255.255.0 for most home networks.
For the gateway, both units should have the same gateway which is 192.168.1.1.
Note: to avoid lossy connections, when you start connecting the NVRs ensure that all cables are securely connected to the devices before proceeding.
Step 3: Link the Dahua NVRs
At this point, the IP addresses for Dahue NVRs have been assigned and you just need to link them together.
Re-connect the main NVR again to the monitor or TV and then follow the next step:
1- Open the web interface of the main Dahua NVR and navigate to “Camera” > “Camera List“.
2- On this page, click on “Device search” and wait for a few seconds.
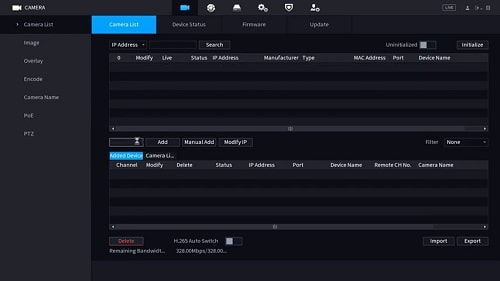
3- The 1st Dahua NVR will appear on the screen, click on it, and then press the “Add” button.
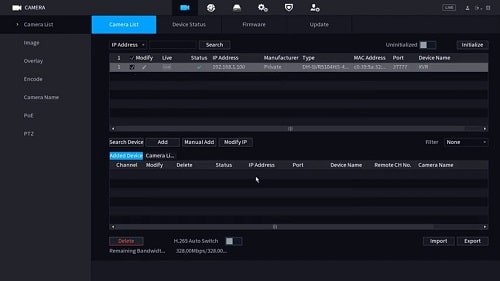
4- Once added choose the NVR channels to view them on the main NVR screen.
Alternatively, from the live view interface, you can click on the “+” icon and it’ll allow you to add the NVR manually.
On the same page, click on the “Manual Add” button. After that, enter the IP address of the 2nd NVR along with its username and password, not the main NVR. Click “OK” to save the settings.
The main NVR should now be connected with the 2nd NVR, and you can verify this by navigating to “Connection” > “Network“.
You should see both NVRs listed with the status “Connected”. If they are not connected, verify that your network settings are correct and try again.
Whenever the connection is established, you can start adding cameras to each unit and setting up remote access.
After that, disconnect the cable from the slave NVR. You have now successfully connected both Dahua NVRs together.
At times, the main NVR is rebooting, so consider checking if the NVR restarting or not after connecting both NVRs to complete the next steps correctly.
Step 4: Connect the cameras
Now, the two Dahua NVRs have been connected and configured, the next step is to add cameras to each unit.
You can add cameras to your NVR via IP manually or by connecting the camera directly to the NVR using an Ethernet cable if your video recorder is PoE.
For example, if you’re using an IP camera, first you need to plug the camera into your router or switch.
Then you can log into your NVR and go to “Camera”> “Camera List”. From there, you can manually add the camera by entering its IP address.
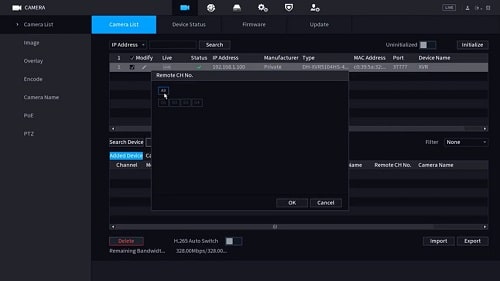
You can also add cameras directly to your NVR by connecting them with a network Cat5 or Cat6 cable.
To do this with IP PoE cameras and NVR, take the 1st rj45 connector for the ethernet cable and connect it from the camera LAN port to an available LAN port on the back of the NVR.
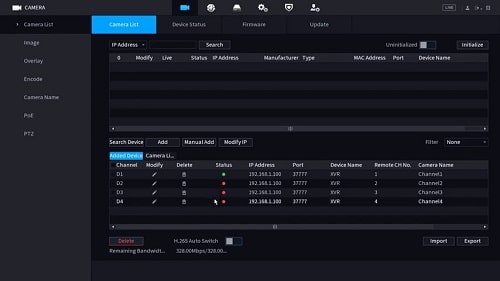
Then log into your NVR and go to the Camera section. You should see the pre-installed cameras listed on this page. Find your wireless camera IP on the list and then hit “Add” to add it to your NVR.
After you’ve added all of the cameras to your NVR units, you can assign each camera to a specific channel and configure its settings.
Step 5: Watch camera feeds
Alright, the two Dahua NVRs have been connected, and you can easily set up remote access to view the cameras from anywhere.
To do this, make sure that both units are connected to the same local network and that each unit has its own unique IP address.
After that, you can set up port forwarding on the main NVR so that it can be accessed remotely.
To set up port forwarding on the main NVR, log into its web interface and navigate to Main Page > Network > Port Forwarding.
Here, you will be able to add a new port forwarding rule and select the IP address of the slave NVR so you access the 2nd NVR from outside of your local network.
At that point, the port forwarding has been set up, you will be able to access and view the 2nd NVR IP cameras from any device connected to the internet.
To do this, open a web browser on your device and enter the IP address of the main NVR followed by the port number you have set for port forwarding.
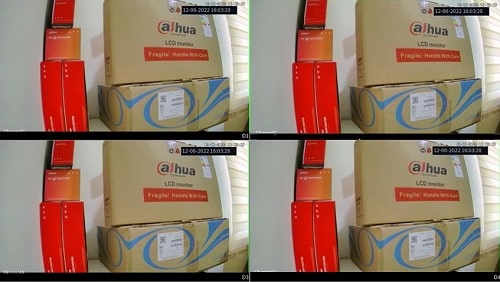
In a short time, The live stream of all of the cameras connected to your Dahua NVRs will open up on the monitor.
To know more, watch the next video for adding Dahua XVR into another XVR or Dahua NVR into another NVR.
Source: Dahua Technical Engineer
Can I access Dahua cameras when away from home?
The answer is Yes, you can access Dahua cameras remotely when away from home. To do so, you need to enable the remote viewing feature on your video recorder whether NVR/DVR. After that download Dahua mobile app or SmartPss viewing software on your PC or laptop to watch your Dahua surveillance cameras when you’re away from home.
Before you go…
The steps mentioned above aren’t specific for NVRs only, you can apply them to add Dahua DVR to another DVR, also if have Dahua XVR you can use the same steps with a little change in settings, and connections.
This means that you can combine your analog CCTV cameras and manage them from one DVR without the need to purchase a new unit for each group of surveillance cameras.
Related Articles:
