It’s a challenge to install security camera in Elevator, as it’s considered a hard process for both beginners and professionals.
Nowadays, the crime rate is increasing Murder, theft, harassment, and violation of privacy laws are common in the elevators, there is no place that is considered safe.
So, engineers think that mounting surveillance cameras in the elevator is the best solution to monitor these crimes. Further, it’ll prevent violation of privacy laws in the buildings.
There are some important points that you should consider before installing a security camera in an Elevator such as:
- must be used for legitimate business.
- Installed at a high vintage angle that records the footage only.
- The elevator has enough light sources to enable the camera to record footage in low light.
Is it possible to install a security camera in Elevator?
The answer is YES, you can install security camera in elevator by mounting a wifi transmitter device on the elevator and a wifi signal receiver on the bottom/top of the lift.
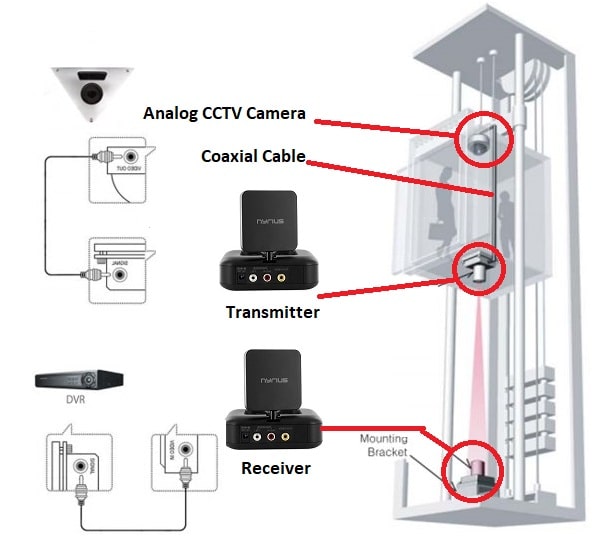
So, the CCTV camera captures the footage at first, and then sends it to the transmitter which makes a bridge with the receiver, after that the receiver directs the captured images/videos to the video recorder(NVR/DVR) to store.
If you don’t know how. Don’t worry. Below is the step-by-step guide for installing security cameras in Elevators.
What are the tools used to install security camera in Elevator?
Well, there is more than one tool you can use to get the installation process of the security cameras in the Elevator done without hiring professional installers.
Also, the tools depend on your system type. Is it a wired or wireless system? but overall there are some common tools such as
- HD ELT3 camera (Analog CCTV camera).
- RG 59 coax cable.
- Wireless transmitter(CPE router).
- Wireless receiver(Access Point).
- IP camera (Network IP cam).
- Strong UTP cable designed for elevators.
- Power wires.
- DVR/NVR.
- ScrewDriver.
What is the best security system for Elevator? Wired or Wireless?
The two systems are effective to use in any place you want, but the selection between wired or wireless systems depends on customers’ choices.
There are people who hate to deal with camera wiring and see it cause a lot of problems while others love wired systems because of durability.
If you’re confused about what is the best here are the differences
Wired Security Camera: The expenditure of wired security cameras is less than that of wireless cameras. Moreover, the installation procedure of a wired security camera is very complex.
Further, wired installation consumes much time as the number of floors increases, increasing cable costs. Installation of a wired security camera requires more labor and more than two installers are necessary for one elevator.
Wireless Security Camera: Contrary to a wired security camera, wireless cameras are too expensive.
Moreover, its installation procedure is straightforward because it doesn’t require wires and cables.
However, they are costly, but the price of wireless cameras is continuously going down. Only two installers are necessary for one elevator.
Now, Let’s see the steps of
How to Install Analog Security Camera in Elevator?
Installation of a security camera inside the elevator is legal which means that permission is not necessary for its installation.

You can easily install a wireless security camera in the elevator of your office, building, construction site, and mall.
It is the best way to reduce any inconvenience and crimes. Below are the simple installation steps:
Step1: Select the Suitable Angle
Firstly, to install security camera in elevator you should decide where to place it.
Selecting the right angle for the security camera installation will allow you to control and cover more details in camera videos.
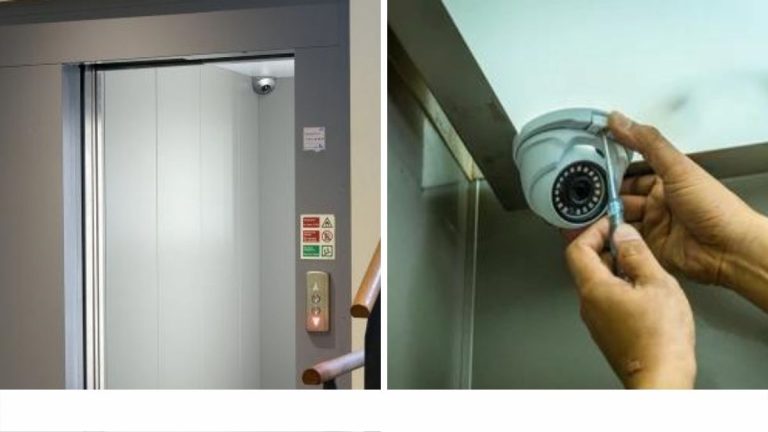
For the elevator, the top corner is the best placement to mount your camera in.
Because the camera has an outstanding lens that covers a wider angle, these ultra-lens remove all kinds of blind spots.
Step2: Put the Mount template and Attach the Camera
The mounting template is an adhesive tape used to mark points of camera screws.
First, Put the mounting template, and then use the marker or pencil to mark screw spots, after that turn on the hammer drill for holes.
Second, remove the front cover plate (made up of metal) of the camera. After that, install the base of the security camera with bolts or screws.
Step3: Run the Coax Cable Between camera and the Transmitter
The third step in installing an analog CCTV security camera in the elevator is to make the cable connections between the system devices.
For a security camera, connect the coax cable that comes out from the security camera with the input wireless transmitter device.
RG59 is the most commonly used coax cable with analog systems in the elevator. In addition, you will need a CAT5 line to join the input device to the antenna.
The best place for installing a wireless transmitter and its antenna is below the outer part of the elevator.
Step4: Connect Receiver and DVR
The next step in installing an analog camera in the elevator is similar to the previous step.
For the receiver device, you want to connect the output of it to the Digital Video Recorder.
So, bring the Coax cable and connect it from the Receiver BNC input to the DVR input port.
After that, connect the receiver box to the receiving antenna by using a Cat5 Ethernet cable.
Now, you finish the wiring of your system and it’s ready to start once you connect it to the power.
Note: in the antennas, there is a DIP switch that allows you to decide which device will send the signal and which one will receive it.
Step5: Connect DC Power Supply
Now, install a DC power supply with the 12v power adapter included with the transmitter.
Connect the Power of the DVR and the analog security camera and your system is ready to monitor and record videos.
Step6: Hook up the DVR to the TV Screen and Set-up the User Interface
Now, you’re completely done with installing security camera in elevator task.
You just need a few seconds to set up the DVR settings and link your DVR to the monitor to watch camera videos live.
The connection between the DVR and the TV screen or monitor depends on using an HDMI cable.
Once you finish this, you can turn on your DVR, then open the settings page, and start to set up configurations and create rules for remote viewing.
Note: make sure the DVR you use has a large storage space to save your recording and footage for a long time.
How to install a Wired PoE IP Security Camera In the Elevator?
In the words above we mentioned how to install security camera in elevator for analog CCTV systems.

In the next words, we go through the installation steps of Wired PoE IP cameras.
There are differences between the two wired systems such as the type of cables used in each system, the video recorder device, and more.
For now, Let’s see the steps
Step1: Select where You Want to Mount your Camera
Wired security camera installation is not easy because you cannot install it at any random point.
Carefully, analyze each location and select the place that covers every corner of your elevator.
For homes and offices, The best place to install a camera is the front door, as it captures the faces of burglars who try to enter your area.
The same also with elevators, you should install a camera in the top corner to capture who enters from the lift door.
In case you want to get full coverage for your elevator, you can use a steady or rotating (360-degree) security camera.
Step2: Place the Camera
Now, you finish selecting the location, the next step is to place the mounting template and attach the camera.
First, mark the screws spot on the template, and then use the hammer drill and start to make holes.
Second, Remove the front cover of the camera. After that, place it on the elevator and tighten its screws.
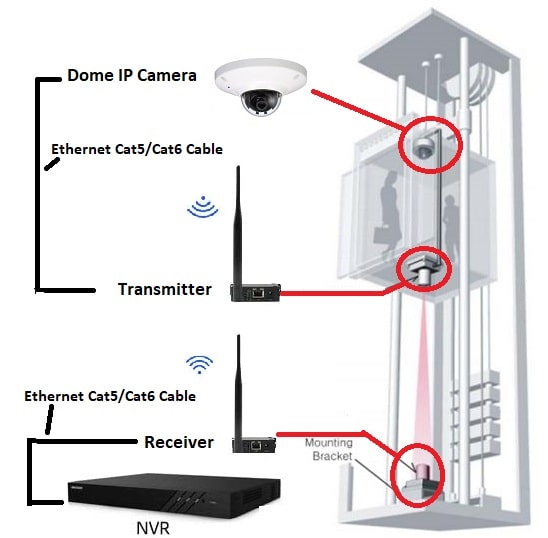
Step3: Run the Ethernet Cable From the IP camera
When I decided to install security camera in Elevator. I only had a PoE IP cam.
I was thinking about what type of equipment I should use to send the IP camera signal to NVR.
After a long time of unsuccessful methods, I decided to use Ethernet to WiFi Wireless Adapter. you may ask
What does an Ethernet to WiFi Wireless Adapter do?
Well, this device allows you to transmit your PoE camera signal through WiFi. Just connect the camera Ethernet cable to the port of the wireless adapter and you finish.
There are many modules of this device available in the market, it differs only in the power source. Some devices have a Wall Plug Design, while others are powered by a USB cable linked to a Power adapter.
Note: you can mount the Wi-Fi to the Ethernet Adapter device at the bottom or the top of the elevator depending on your power outlet location.
Also, make sure you’re using the STP Ethernet cable (Shielded Twisted Pair) to make the connections between devices in the elevator.
Step4: Run STP Ethernet Cable to NVR
The last step in installing a PoE IP camera in the elevator is to connect the NVR with the receiver.
There are separate transmitters and receivers that you can purchase from online stores such as Amazon, and Walmart.
If you don’t find it, you can go for an alternative way which is converting your home Wi-Fi router to a receiver/access point.
Use the same STP cable to link the two devices NVR (where footage is recorded) and receiver.
Note: Ensure that your cables are not bent or cut by using a cable tester tool.
How to Install Wireless IP Security Camera In Elevator
Installing a wireless security camera in an elevator is considered the best solution for monitoring what happens inside your lift.

Wireless security cameras have been used widely in the last few years because it’s easy to use and take a few minutes to install.
So, if you have a wireless system and want to install it in the elevator, Here are the steps
Step1: Select Perfect Location
Similar to what we do in the previous steps, you should look for the best placement to put your wireless IP cam in.
The location of the camera should be high and cover most of the elevator areas.
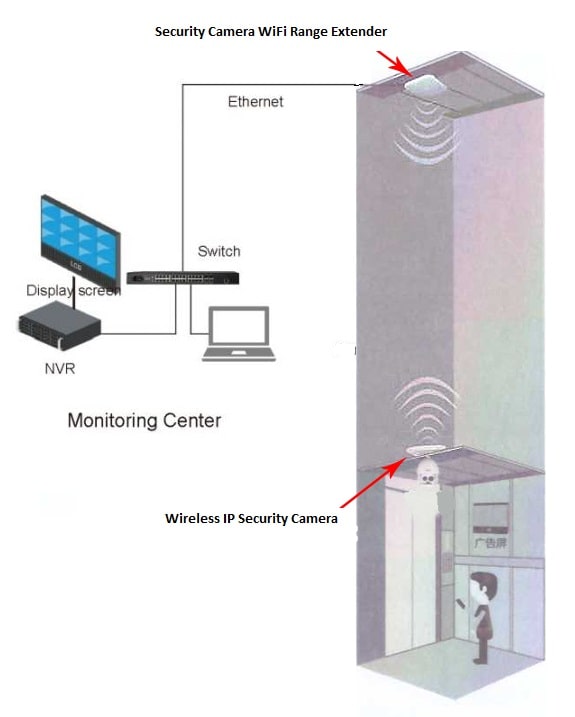
Plus, it should be mounted near the Wi-Fi signal booster whatever device you use(router, or access point).
Step2: Mount the camera and make the Connections
The second step in your installation process is to mount your wireless IP security camera and link it to the Wi-Fi signal.
Wireless systems are powered by cables, unlike wire-free cameras that are powered by long-lasting batteries such as Reolink, and Blink security cameras.
So, make sure you have a power source to feed your camera system and must be near the camera location.
Step3: Install Security Camera Router Repeater
To install security camera in elevator correctly you should have the right tools, and to connect your Wireless security camera to NVR you should have a repeater.
The repeater that we will use in our installation journey is the Hiseeu router repeater.
This device has an ethernet port that is connected to the NVR, and a Wifi signal antenna to boost your wifi signal range.
First, connect the Hiseeu router to the Network Video Recorder by using an ethernet cable, and then connect it to the power supply.
Second, turn on your wireless cameras and link them with the Hiseeu device. So, when the camera sends the data it will pass through the IPC and then to NVR.
Now, you’re done with installing a wireless security camera in the elevator.
There are many ways that you can use to do this task but we choose the simple, easy way.
Note: You can change the antenna of the wireless camera and replace it with a powerful long-wire antenna available out there.
Tools Recommendations
These are our recommendations for existing tools that we use during our installation process of security cameras in Elevators, some of these tools are designed specifically to use in elevators.
If you have any of the below tools don’t purchase them, save your money and use your tools.
| Product | Specification |
|---|---|
| Elevator Analog CCTV Camera | – 1080P – 4 in 1 |
| Nyrius Wireless Video Transmitter & Receiver | – 5.8GHz – 4 Channels – Cover up to 225 ft |
| Bcom Wireless Signal Extender | – Ultra Long Distance – Cover up to 3200 ft – Portable Mini Design |
| Hiseeu Security Camera WiFi Range Extender | – Easy to setup – 2.4 GHz |
| DEWALT Hammer Drill | Battery Powered 3-Speed 40-Piece |
| Ximytec Screwdriver | – Cordless – 45Pcs Screw Bits – 250RPM speed |
| DEWALT Masonry Drill Bit | – 7-Piece – Electric or cordless hammer drills – For Brick, block, concrete, and masonry |
| Swann BNC Coaxial Cable | – For CCTV System – 100 Ft / 30 M |
| ZOSI Cat5e Ethernet Cable | – High-Speed Network RJ45 Wire Cord – For PoE IP System – 100 Ft / 30 M |
Note: These mentioned tools can be used to install security cameras on the concrete, soffit, or anywhere you want to place your camera.
Summary
The above discussion contains the step-by-step installation of the security camera in the elevator.
Moreover, we discussed each aspect of the structure of wired or wireless security cameras.
Installation of security cameras in the elevator is mainly done to check the activity of people using elevators.
When you want to install an analog camera, you must select the wired option.
But when you want to install IP cameras you must go with the wireless option. The wireless option is easy to install and doesn’t require a professional person to do it.
Further, wireless security cameras can be maintained very easily and If you want to keep your home design without holes, you can mount a security camera without screws.

